:Sample color page for:
Strange Creatures
Coloring book.
((KILL YOUR NAME))
Art for my boys Band.
I prefer to start off with a hand illustrated sketch before scanning it in and working digital. This gives the client the opportunity to make modifications to the rendering before proceeding to digital.
Working on gray scale shading in Photoshop before adding overlays and multiples with color.
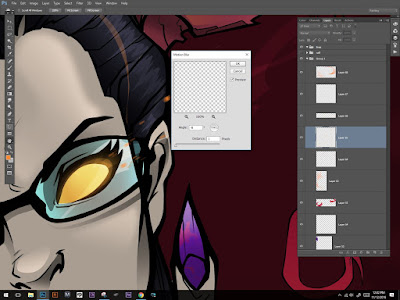
When creating a glow effect from eyes, I find it fun to use a sharp brush to add sharp smudges and circles to where the glow is radiating from, than adding a motion blur. Filter>Blur>Motion Blur.
Adding small detail will not be directly noticed in the composition but it will aid in the realism of color and shading, leaving the viewer to question how you did it. Time consuming but worth it.
Adding Different value skin towns to bring out the form, mixing up overlays and multiply blending moods, Purples and beige.
When fine tuning your shades and highlights it is some times practical to use the warp tool in order to have the value fit the object you are shading. (CTRL (T) RIGHT CLICK, WARP) After fitting to the shape you desire, depending on the material you are trying to imitate you may use the Blur tool to soften up the edges. (FILTER>BLUR>GAUSSIAN BLUR) as seen below.
Using color overlay can save you a lot of time, rather than re-shading the hue. Double click on layer you wish to modify, than play around with blending modes and colors as shown below with the glasses..
As a muralist trained in spray paint, I tend to carry my practices back and fourth between the wall and the digital grid. Normally when painting a mural I tend to use black only as a primer. this way when adding color I can save time and not drowned out the composition, In this step below I am demonstrating using a darker hue of read to shade the chain rather than using black. Adding a multiply and than drooping it down to about 75% opacity will give the effect I am looking for. You can also change the opacity value by pressing and holding down v to select the move tool with layer selected that you wish to change and pressing numbers one through zero.
BIG SHOUT OUT TO
(Support Indie Comics) on face book, group
page and Dani Smith, creator of
Black Dog and Rebel Rose.
Thank you for sharing this post.
More to come on this tutorial tonight but almost dun.
Noticed her skin color looked to dead do took original fill and added a cover overlay in layer styles. (double click on original fill>color overlay) Bellow.
Final for this pies is to lay down the font. added a layer mask instead of erasing the portion that is not seen behind her. The reason why I used a layer mask instead of erasing it, is because if the client had modifications to the font I would not have to redo it just use the paint brush with layer mask selected and make sure White is the foreground color.
Bellow is A video Edited by Sean Nelson, lead singer of
KILL YOUR NAME.
You will be able to see other art I have designed for the band in the video.
Decided not to add the shaving blade.


I want to see more! You have a hell of a knack for instruction.
ReplyDeleteTY! I plan on doing a custom brushes tutorial today in Photoshop.
Delete